Build a Custom LLM for Slack in Under 1 Hour
With the right tools, building a custom Slack Chatbot is much simpler and useful than most think. Slack’s accessible API, widespread internal use, and extensibility make it a natural choice for deploying an AI-powered chatbot. This guide walks you through the key steps to get your chatbot up and running on Slack, adaptable to other messaging platforms with developer-friendly APIs.
Common Misconceptions About AI-Powered Chatbots
Many assume creating an AI-powered chatbot requires specialized machine learning knowledge and comes with high maintenance costs. In reality, with preconfigured LLM applications, you can develop a chatbot without extensive technical expertise. Platforms like Slack, WhatsApp, and Discord, combined with LLMs suited to natural language processing such as Claude, Llama and Mistral enable seamless and genuinely useful chatbot deployment.
Slack Thinks AI Is Valuable Too
Slack has integrated AI into its platform, demonstrating their belief in the technology's potential to enhance their product. Slack AI offers a range of features, including summarizing lengthy threads, generating drafts, and providing intelligent search suggestions. While they charge up to $10 per user monthly for Slack AI, a custom chatbot can deliver similar functionality at significantly lower cost – plus you can tailor it precisely to your company's needs.
Example of a Slack LLM Chatbot in Action
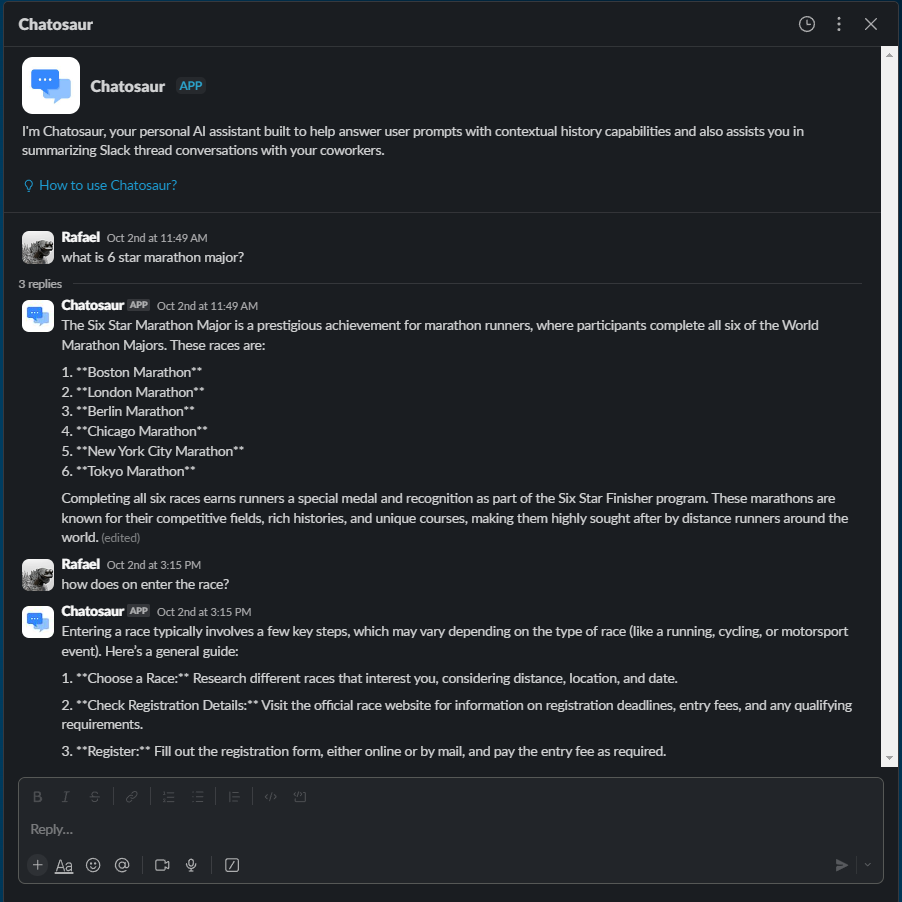
For illustration, imagine a Slack Chatbot capable of responding to user inquiries, summarizing threads, and assisting with FAQs within a workspace. Slack’s robust API and framework facilitate such functionality, allowing access to messages, threads, and other workspace data. This access is foundational for creating a bot that leverages context to provide relevant responses.

Building the Slack Chatbot
An over simplification of how the Slack Chatbot works can be described using this simple diagram. We’ll be using this diagram to guide you for every step of building Custom LLM Chatbot for your Slack.

Step 1: Setting Up Your LLM Application (15 mins)
Objective: Create the LLM Application that will give response to the chatbot.

To begin, we’re going to build an LLM application that is suited to your requirements—whether it’s for basic conversation, customer support, or specialized knowledge queries.
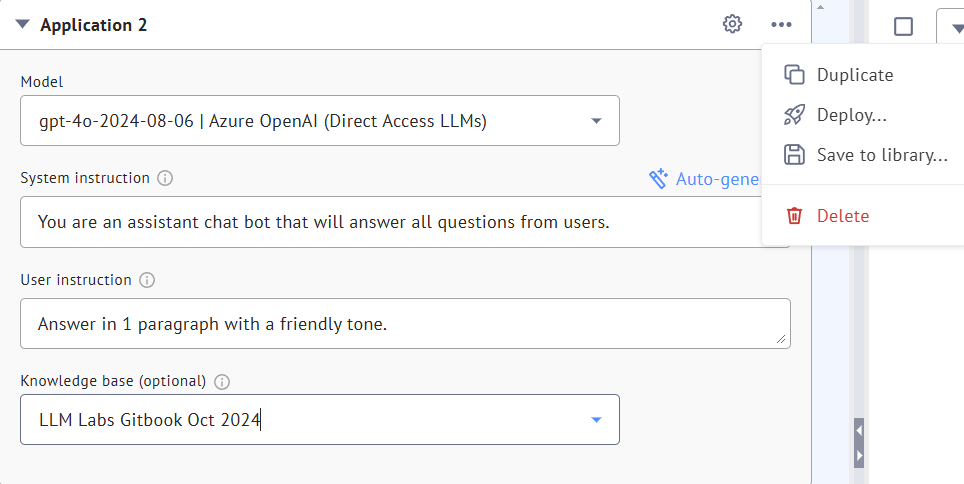
Using Datasaur can simplify this process. With Datasaur’s LLM Labs, you can quickly create, deploy custom pre-trained or fine-tuned models. You can configure your chatbot behavior by setting up system instructions and hyperparameters. You can also upload files to the Knowledge Base to enhance the LLM’s knowledge and allow it to answer domain specific questions.
To set up an LLM on Datasaur:
- Sign up or log into Datasaur’s LLM Labs platform, and go to Sandbox to create your LLM Application.
- Select the model that aligns with your chatbot’s use case, such as customer support or general assistance. There are a lot of models available, but for starters we suggest using some of the popular models such as GPT 4o, Claude 3.5 Sonnet, Llama 3.2 or Google Gemini 1.5.

- Configure the LLM’s settings as needed. In this case, we are building a summarizer and want to focus on lower costs, so we chose Llama 3.2 via Amazon Bedrock.

- The last step of building LLM Application is to deploy it. To do so, simply click the three dots in LLM Labs and click Deploy.

- Upon deployment, Datasaur provides an API endpoint which you’ll need for integration with Slack. However, you’ll also need to generate an API Key to be used for your Slack Chatbot. To retrieve your API key, simply click “Create API Key” in the deployment page of LLM Labs. Keep the API endpoint and API Key somewhere safe for now. Should you lose your API Key, you can always regenerate a new one in LLM Labs.

Step 2: Configuring the Slack App (5 Mins)
Objective: Setup the correct configuration for the Slack Chatbot Application in your Slack workspace

To build your Slack Application, make sure you have a development workspace in Slack where you have permissions to install apps. If you don’t have one, go ahead and create one here.
Next, we’re going to set up the correct configurations of the application that we’re building, which is a chatbot. To help set up the configurations, we’ve provided a manifest that can quickly help set up your chatbot configuration. This manifest contains all the basic configurations (ex: name, type, description, etc.) needed to register an application on Slack. You will also input your own Slack Chatbot name by changing the configuration under display_information when pasting it to Slack configuration. To do so:
- Open https://api.slack.com/apps/new and choose "From a manifest".
- Choose the workspace you want to install the application to.
- Copy the contents of this manifest.json into the text box that says *Paste your manifest code here* (within the JSON tab) and click Next. Change the name of the chatbot under
"display_information": {
"name": "Datasaur Simple Slack Chatbot" - Review the configuration and click Create.
- Click Install to Workspace and Allow on the screen that follows. You'll then be redirected to the App Configuration dashboard.
Step 3: Build the Application (30 mins)
Objective: Build and deploy the application that will handle the message traveling back and forth between LLM Application and Slack Application

For this step, we are going to build and deploy the application to handle the messages traveling back and forth between LLM Labs and the Slack Chatbot Application. We have created a simple repository (repo) that contains simple tools to enable the Slack chatbot. We recommend using this as a template.
"The repo contains the files needed to create a simple chatbot application in Slack from zero. More details below:
- listeners folder: this contains the files to handle all events that will trigger the chat app:some text
- actions folder: contains the files to handle adding and removing an endpoint
- summarizer folder: contains the files to handle summarization from a thread
- events folder: contains the files to handle the app when being opened in Slack and when the app being mentioned
- shortcut folder: contains a file to enable summarizing from the menu rather than using it in a thread
- views folder: contains files to retrieve and view previously added endpoints directly from the Slack application.
- services folder: this contains the service file that will handle the chatbot to act when being used, whether to summarize text in Slack, or being used as chatbot
- app.py: the main script that initializes and runs the Slack chatbot. it handles receiving and sending messages, parsing commands, and setting up event listeners.
- .gitignore: file that specifies which files and directories Git should ignore when committing changes to the version control system.
- README.md: this provides instructions on setting up and running the chatbot, including Slack app configuration.
- pyproject.toml: file is used for Python project configuration. It defines the build system requirements and metadata about the project, such as dependencies, the Python version, and package information.
- manifest.json: Defines the Slack app configuration used when setting up the bot in the Slack workspace. This is the file that we previously used to configure the app settings in Slack.
- requirements.txt: Lists the Python dependencies needed to run the chatbot.
- start.sh: A shell script to set up and run the bot.
- .env.example: important; this file will later need to be renamed to .env. This file contains 2 pieces of information that we’ll get from the steps 3b below: some text
- SLACK_BOT_TOKEN
- SLACK_APP_TOKEN"
3a. Cloning Repository
To quickly build and deploy your application, you can clone the repository provided. To clone the repository, you’ll need to set up git locally and may also need to create a github account. Then, follow this step:
- Download and Install Anaconda https://www.anaconda.com/download/success
- Install gh cli using Anaconda Prompt, then use this command:
conda install gh --channel conda-forge

- Finally, clone the repository using this command:
gh repo clone datasaur-ai/simple-slack-chatbot

After cloning the repository, some permissions need to be configured to ensure the message is going back and forth to the correct LLM application and Slack App.
3b. Getting SLACK_BOT_TOKEN and SLACK_APP_TOKEN
As described above, we’ll need to replace the information in the .env.example file and replace it with the tokens that we’re going to get.
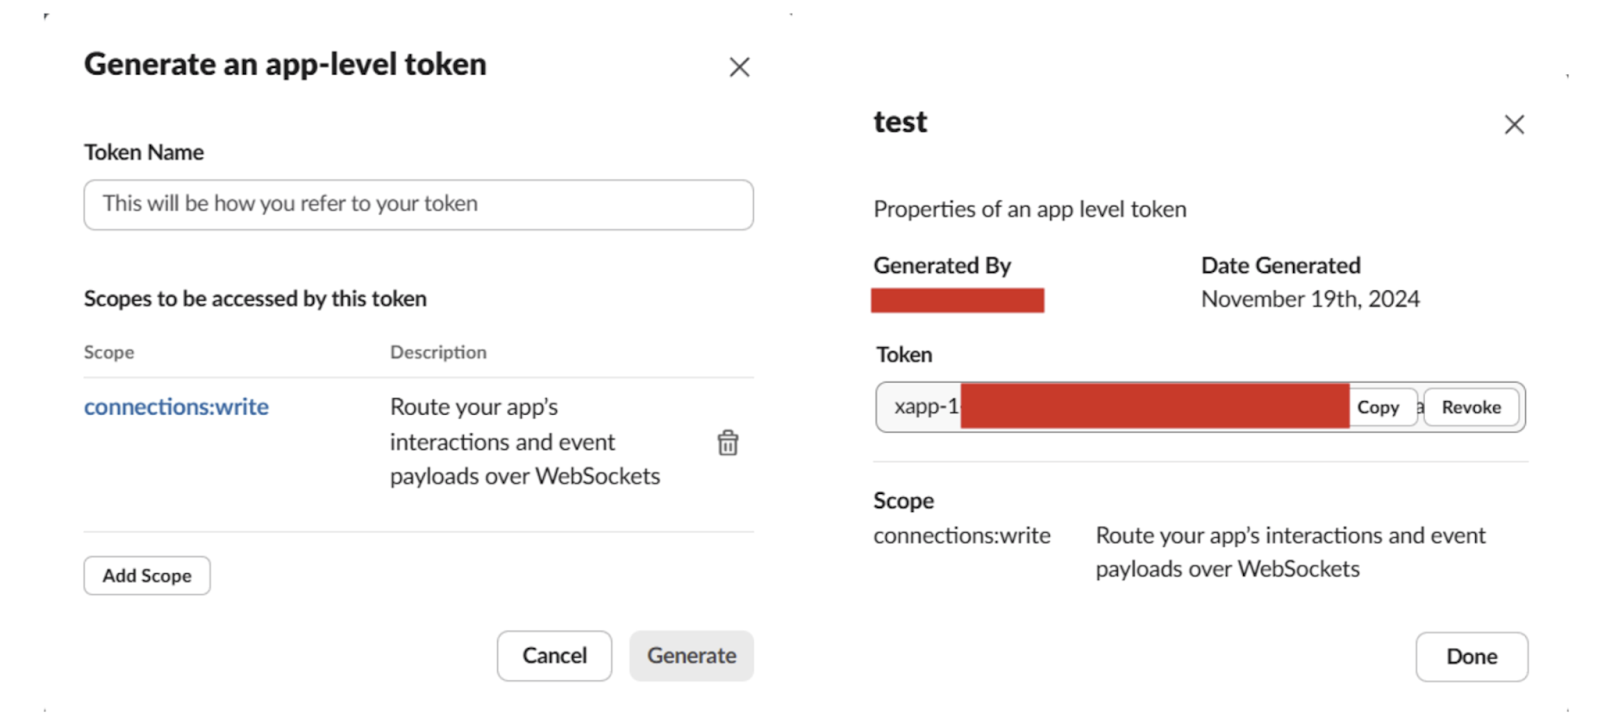
- To get SLACK_APP_TOKEN: return to the Slack web app, click OAuth & Permissions in the left-hand menu, and follow the steps in the OAuth Tokens section to install the OAuth. Copy the Bot User OAuth Token and keep it. Copy this token to be used in your environment as SLACK_BOT_TOKEN.

- To get SLACK_BOT_TOKEN: click Basic Information from the left-hand menu and follow the steps in the App-Level Tokens section to create an app-level token with the connections: write scope

- Navigate to your stored repository in your local storage. As an example, following the steps of cloning the repository above, it is stored in C:\Users\Admin\simple-slack-chatbot.
- Copy and modify .env.example to .env and replace the placeholder values with your bot token and app token from Step 1 and Step 2, respectively.
- Your .env file should look something like this. Don’t forget to change the file type from .env.example to .env

Once you have successfully set up the environment variables, you can run the app by executing the command `start.sh` from the Anaconda Prompt terminal. Make sure you’re in the correct directory to execute the start.sh file (for example: C:\Users\Admin\simple-slack-chatbot).
Step 4: Setup the Slack App (5 Mins)
Objective: Setup the correct endpoint and API key in the Slack Chatbot.

The last step is to set up the endpoint and API key we’ve prepared in the step of building an LLM Application at the beginning. To do so:
- Go to your Slack workspace and find the Slack Chatbot Configuration Page. If the app is not shown, click Add apps and find the name of the Chatbot application.

- Go to the Home tab of the application, and add the endpoint.

- Use the deployment endpoint URL and API key that you set up in Step 1.
- You are now ready to use the Slackbot in your own Slack workspace!
Recap
To recap on how to build AI Slack Chatbot, what we need to do:
- Step 1: Create and Deploy the LLM applications as the main “processor” of the chatbot
- Step 2: Setup Slack Application configuration in the Slack workspace
- Step 3: Build and Deploy the Slack application to handle the message traveling back and forth between Slack and LLM application
- Step 4: Configure the endpoint and API key from the LLM application built in step 1
Expanding to Other Platforms
While this guide focuses on Slack, the steps can be adapted for other platforms that offer API access, like Discord or WhatsApp. By following a similar integration flow—message retrieval, context gathering, response generation, and output—you can deploy similar AI chatbots across multiple messaging environments.


